Making Your Own Gallery Wall
•Posted on January 12 2023
I'll admit that I wasn't always a fan of gallery walls. I thought they were too busy, and I'm kind of a minimalist when it comes to my own decorating. Only after helping our customers create theirs, I grew to embrace them, and now I have lots of fun creating one for every season at the store.
What I've come to really appreciate about them is that they can reflect your personality and tell the story of your family. It can really say something about the people who live in the home, giving your living space more character. Your character, as a matter of fact! There are also so many combinations you can create with shapes and textures, and they can fit in with literally any home decor style you already have. And best of all, they're fun to make!
So what is a gallery wall? A gallery wall is a curated collection of art, decorative items, photos, and more that reflects your personality and style. It's also the perfect way to fill a large wall!
A great gallery wall can be pictures, art, architectural pieces, signs, found items, handmade items, collectibles, or inherited items like your grandmother’s china. No matter what style you choose, your gallery wall is going to be amazing because it is a reflection of you and yours.
Let’s take a look at some gallery walls I have created over the years in our store.

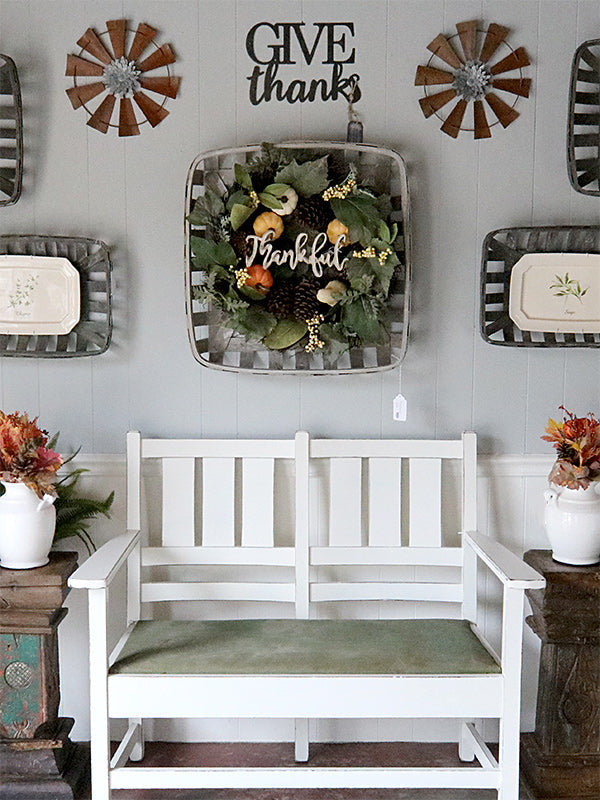
Tobacco Basket Wall
If you are a lover of the tobacco basket like I am, you will appreciate this gallery wall. I love tobacco baskets because of their rustic texture and great color. They are also the perfect backdrops to display your decorative plates, family photos, wreaths, and signs. Here I have added herb platters, our script signs, and paired it with some colorful floral. It's the perfect way to fill that large blank wall in your dining room or kitchen.
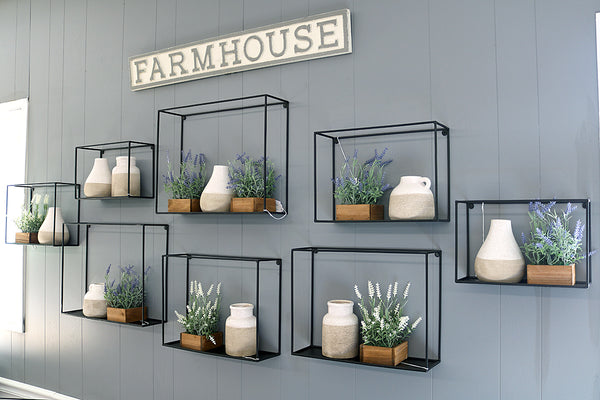
Modern Gallery Wall
We created a more modern gallery wall with this metal shelf arrangement. The sleek look and different size shelves create visual interest on their own, but when adding this collection of pottery it creates quite an impact. I added the lavender in wood pots to soften the look a little and to give additional texture and color.
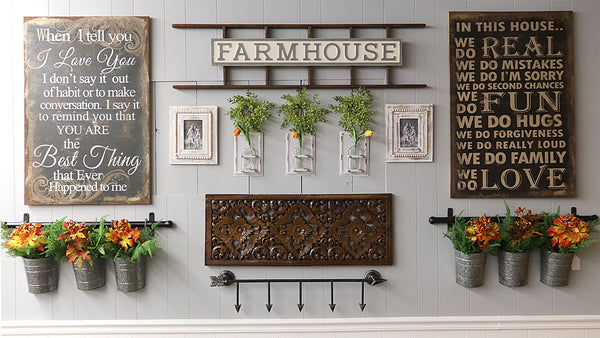
Farmhouse Gallery Wall
Farmhouse gallery walls have been a hot trend for the past several years, and it's a great way to display your charming vintage treasures. It's also is a way to mix the old with the new, which is what we at Revived are all about. Here I started with an old ladder and a pretty carved architectural piece. I added some family photos, rustic bottle plaques, and a couple of our burlap signs. The mixture of wood, metal, and fabric, creates visual interest and dimension and the flowers add a fun pop of color.
How do I do it?
If you're inspired to create a gallery wall for your home, you might be asking yourself, "How do I arrange it all so it looks great?" It's easy! All you need is some old wrapping paper, painters tape, scissors, nails, and a hammer. Or, you can skip the nails and hammer and go the 3M velcro route!
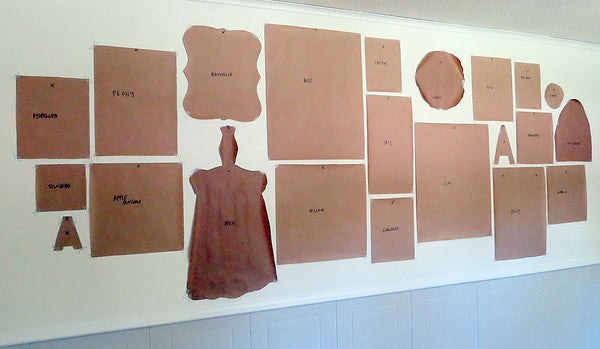
Step 1: Plan, Plan, Plan
Lay each piece going into your gallery wall on the floor in front of the area where you plan to hang it. Start with the largest pieces, or the pieces that you want as a visual focal point, and build around them. Arrange it piece by piece until you are happy with the layout. Don't worry about spacing. The beauty with creating the layout on the floor is so you can move things around until you are happy with the look. It will all fall into place. Trust me!
Step 2: Cut It Out
Once you’re happy with the floor arrangement, pull out a roll of wrapping paper, trace the shape of each of your items, and cut it out. While you're at it, you can also save yourself some effort later and mark on the paper where the hangers are, so it will be easy to spot where to put your nails or Velcro hangers. You should have one piece of paper per piece.
Step 3: The Test Run
Using painter’s tape, tack up your arrangement as you had it on the floor, starting at eye level for the larger or focal pieces and moving out from there. A level may come in handy here. Also, keep furniture placement and ceiling height in mind as to avoid anything blocking items.
Step 4: Hanging
Once your paper collage is complete and looking the way you want it, it’s time to put hammer to nail. Nail picture hangers through the cutouts in the appropriate spots, removing each paper cutout as you replace it with a frame. When all items are hung, give yourself a hand for creating a beautiful reflection of you!
Gallery walls are easy to keep updated and fresh by changing to new photos, swapping out the floral with the seasons, or just changing it up entirely when you feel like it!
Do you have a gallery wall in your home? We'd love to see it! Post a picture on Facebook and tag us on it!
Looking for more home decorating ideas? Take a look at our previous blog posts!
Comments
0 Comments
Leave a Comment